The section contains an example on how to automate Nexus 9000 using Ansible. Ansible is an agentless open source software that can be used for configuration management, deployment and orchestration of deployment. The scripts in Ansible are called playbooks; playbook is in YAML format that was designed to be easy for humans to read and write. Playbooks include one or more plays, each play include one or more tasks. Each task is associated with one module, which is what gets executed in the playbook. Modules are python scripts that ship with Ansible installation. In this document, you will be introduced to multiple NX-OS modules and ansible template modules.
The first step is making sure you have pip installed. Pip is a package manager for Python. That means it's a tool that allows you to install and manage libraries and dependencies that arent' distributed as part of the standard library. If pip is not yet installed you can find the steps here:
Install Ansible using sudo pip install ansible by copying or typing the command below into the Terminal of your system.
sudo pip install ansible
Verify that Ansible was installed by checking the version. You'll be working with the latest Ansible release.
ansible --version
Upon a successful installation and verification of the Ansible version, your output should look as follows (the version might be different depending on when you install Ansible):
~/Documents > ansible --version                                                                                                       3m 47s
ansible [core 2.12.5]
Ansible calls it's configuration and orchestration framework "playbooks" and is a collections of "play(s)" or tasks for configuration management and deployment to a device or multiple devices in a synchronous or asynchronous fashion. While playbooks can be represented as a single file, Ansible best practices recommend a particular directory structure for playbooks that you will be building below. This directory structure lets you organize files into smaller configuration files for better reuse, particularly into "roles." Roles in Ansible are a way to automatically load certain variables, tasks, etc depending on a categorization. A role can be defined for example by device type or protocol. In this lab, you are working with two distinct device types, spine and leaf. When you get to defining our configuration tasks and variables, distinctly differentiating between device types into separate roles can allow for all spine type devices to be configured the same and all leaf type devices to be configured the same. Additionally, you could create a third role called common for any overlapping configuration tasks between the spine and leaf switches. Before creating the configuration tasks using Ansible network modules, let us create the appropriate directory structure.
In your Terminal, create a directory called Playbooks, then change directory into your newly created Playbooks directory. Create another directory called Ansible-NXOS that will be used to contain the NXOS playbook you will be writing and change into that directory.
mkdir Playbooks
cd Playbooks
mkdir Ansible-NXOS
cd Ansible-NXOS
Within the Ansible-NXOS directory create three more directories; group_vars, host_vars, and roles.
mkdir group_vars
mkdir host_vars
mkdir roles
You are going to use Ansible Galaxy to create our roles within the roles directory. Ansible Galaxy is the official community for downloading or creating roles.
Create spine role directory structure:
cd roles
ansible-galaxy init spine
Create leaf role directory structure:
ansible-galaxy init leaf
Upon successful creation of the roles above, you will have the below lines printed to the Terminal window:
- spine was created successfully
- leaf was created successfully
A useful command has been yum installed using sudo yum -y install tree to view the directory structure created by Ansible Galaxy. You'll notice the leaf and spine directories share a common structure. You will mainly be working within the defaults, tasks, and vars directories. The defaults and vars directories contain variables to be used by the tasks, and the tasks will be placed within the tasks directory.
tree
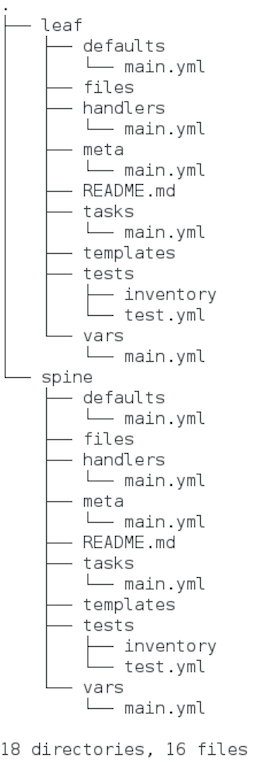
Under the majority of the role directories you'll notice a ".yml" file. Playbooks are written in a simple markup language called YAML, which stands for YAML Ain't Markup Language. YAML is used as it's even easier to read than data structure formats such as XML or JSON that you have previously examined.
YAML files optionally begin with --- at the top of the file to signify the start of the file. Following the file start, comes the Ansible modules written in YAML syntax. YAML syntax for Ansible modules are expressed as a list of key/value pairs. Much like you've dealt with key/value pairs thus far in this lab, this is a dictionary. A list simply begins with a "- " (a dash followed by a space) while as in previous examples, dictionaries use ":". Below you can see an example of YAML syntax that contains a list of dictionaries and where the dictionaries contain lists:
- name: CONFIGURE PROTOCOL INDEPENDENT MULTICAST (PIM) ANYCAST RP
  nxos_config:
    lines:
      - ip pim anycast-rp {{ rp_address }} {{ s1_loopback }}
      - ip pim anycast-rp {{ rp_address }} {{ s2_loopback }}
    provider: "{{ nxos_provider }}"

- name: CONFIGURE PIM RP
  nxos_pim_rp_address:
    rp_address: "{{ rp_address }}"
    provider: "{{ nxos_provider }}"
In the example above, you were introduced to two things: 1) nxos_config and nxos_pim_rp_address which are existing Ansible Network modules. 2) variables and how to use them.
Within the documentation for each network module there is a synopsis of what function the module performs and a table of parameters or keys. The tabulated parameters inform the user which parameters are required for the module to function as a task, which parameters are optional, and what the defaults are for parameters.
As an example, each of these core network modules have basic requirements for arguments to access the device, albeit, some of these parameters may not apply to the network operating system you work with:
_> host - defines the hostname or IP address of the remote host _> port - defines the port to connect to _> username - defines the username to use to authenticate the connection _> password - defines the password to use to authenticate the connection _> transport - defines the type of connection transport to build _> authorize - enables privilege escalation for devices that require it _> auth_pass - defines the password, if needed, for privilege escalation
By default, the transport for all modules is set to use the "cli". In this example, you are going to change that default to utilize nxapi instead. Further, instead of having to include each of these arguments, transport, username, and password, in each task, you are going to make use of the provider parameter to set these arguments as a single variable for each task. You'll set another variable known as ansible_connection to local, which tells the playbook to run on your local Ansible host. The provider argument will then be used to make the NXAPI requests locally.
Ansible allows you to define and reference variables in your playbook tasks using Jinja2 templating; a templating language for Python. A YAML gotcha for Jinja2 is that if you start the line with a Jinja2 templated variable, for example the {{ nxos_provider }} above, then the entire line must be in quotes. Variables can be defined in various locations and Ansible has a precedence system for understanding what and when a variable would be overridden if used in more than one location. The precedence for a variable can be seen below. As an example, a variable in the role defaults directory would be overridden by a variable in the playbook global_vars/all directory and file. Further, both of these are overridden by the local vars directory within the specific role, role vars. role defaults (defined in role/defaults/main.yml) _> inventory file or script group vars _> inventory group_vars/all _> playbook group_vars/all _> inventory group_vars/* _> playbook group_vars/* _> inventory file or script host vars _> inventory host_vars/* _> playbook host_vars/* _> host facts _> play vars _> play vars_prompt _> play vars_files _> role vars (defined in role/vars/main.yml)) _> block vars (only for tasks in block) _> task vars (only for the task) _> role (and include_role) params _> include params _> include_vars _> set_facts / registered vars _> extra vars (always win precedence)
Create an ansible.cfg file to disable hostkey checking for the purposes of this lab.
touch your-ansible-nxos-path/ansible.cfg
cat <<EOF >> your-ansible-nxos-path/ansible.cfg
[defaults]
host_key_checking = False

EOF
Copy the below YAML into the your Terminal window to create the all file and populate contents of the file for the ansible_connection and nxos_provider. Again, this is a file with key/value pairs. group_vars/all is where you place universal variables that apply for all devices.
touch your-ansible-nxos-path/group_vars/all
cat <<EOF >> your-ansible-nxos-path/group_vars/all
---

ansible_connection: httpapi
ansible_httpapi_use_ssl: yes
ansible_httpapi_validate_certs: no
ansible_network_os: nxos
ansible_user: admin
ansible_httpapi_pass: your_password
EOF
For each role, you are now going to create the variables to be used per device and commonly across all devices specified within the role. The device specific variables will be defined under the host_vars directory for each device. The common variables to be used across all devices will be defined under roles/spine/vars/main.yml and roles/leaf/vars/main.yml respectively.
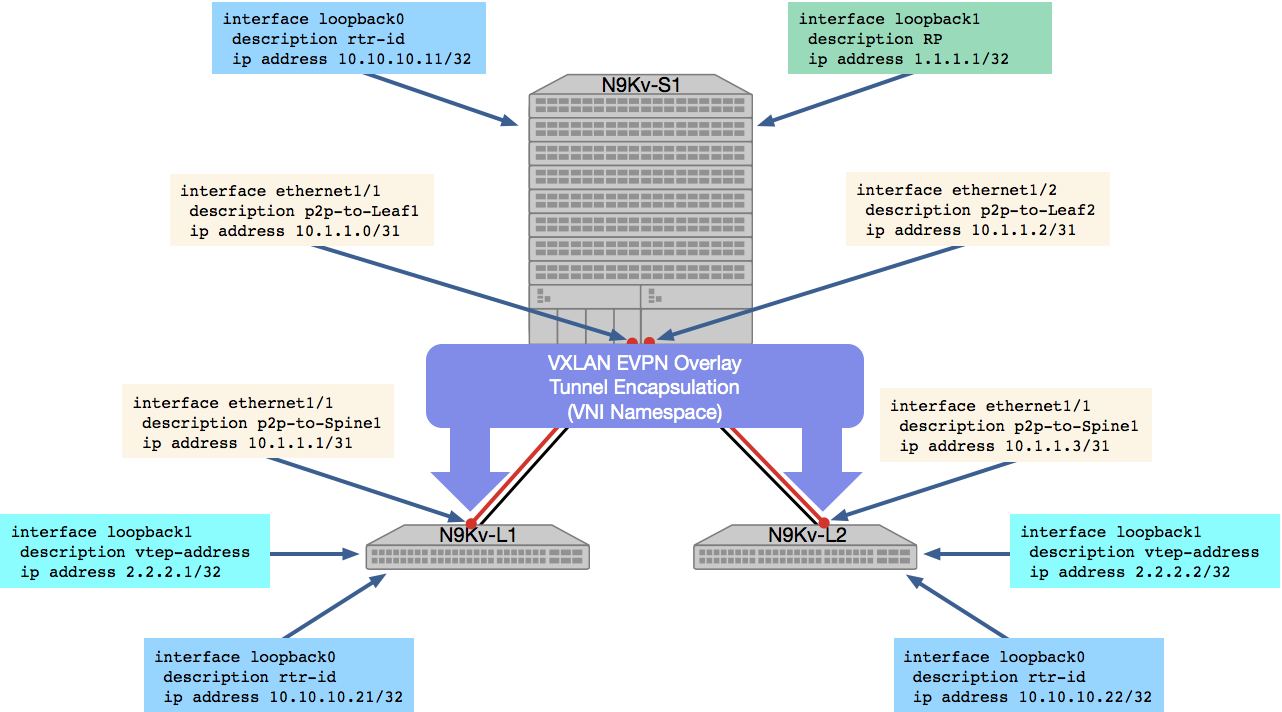
Ansible Host Vars Copy the below YAML files into the host_vars directory for each spine and leaf device. These device specific variables include things such as the router id and the Loopback address used for the Virtual Extensible Local Area Network (VXLAN) Ethernet Virtual Private Network (EVPN) Network Virtualization Edge (NVE) interface.
touch your-ansible-nxos-path/host_vars/10.1.10.11.yml
cat <<EOF >> your-ansible-nxos-path/host_vars/10.1.10.11.yml
---
# vars file for N9K-S1

router_id: 10.10.10.11

loopbacks:
  - { interface: loopback0, addr: 10.10.10.11, mask: 32 }
  - { interface: loopback1, addr: 1.1.1.1, mask: 32 }
EOF
touch your-ansible-nxos-path/host_vars/10.1.10.21.yml
cat <<EOF >> your-ansible-nxos-path/host_vars/10.1.10.21.yml
---
# vars file for N9K-L1

router_id: 10.10.10.21

loopbacks:
  - { interface: loopback0, addr: 10.10.10.21, mask: 32 }
  - { interface: loopback1, addr: 2.2.2.1, mask: 32 }
EOF
touch your-ansible-nxos-path/host_vars/10.1.10.22.yml
cat <<EOF >> your-ansible-nxos-path/host_vars/10.1.10.22.yml
---
# vars file for N9K-L2

router_id: 10.10.10.22

loopbacks:
  - { interface: loopback0, addr: 10.10.10.22, mask: 32 }
  - { interface: loopback1, addr: 2.2.2.2, mask: 32 }
EOF
Ansible Spine Role Vars Copy the below YAML into the spine role vars directory main.yml file. The variables here will be used to for specific features for Virtual Extensible Local Area Network (VXLAN) Ethernet Virtual Private Network (EVPN), Open Shortest Path First (OSPF) parameters, Border Gateway Protocol (BGP) parameters, and Protocol Independent Multicast (PIM) parameters. Remember, each of these are a dictionary with key/value pairs or a dictionary that contains a list of dictionaries.
touch your-ansible-nxos-path/roles/spine/vars/main.yml
cat <<EOF >> your-ansible-nxos-path/roles/spine/vars/main.yml

features:
  - { feature: bgp }
  - { feature: pim }
  - { feature: ospf }

ospf_process_id: UNDERLAY

ospf_area: 0

asn: 65001

address_families:
  - { afi: l2vpn, safi: evpn }

bgp_neighbors:
  - { remote_as: 65001, neighbor: 10.10.10.21, update_source: Loopback0 }
  - { remote_as: 65001, neighbor: 10.10.10.22, update_source: Loopback0 }

rp_address: 1.1.1.1
EOF
Ansible Leaf Role Vars Copy the below YAML into the leaf role vars directory main.yml file. The variables here will be used to for specific features for Virtual Extensible Local Area Network (VXLAN) Ethernet Virtual Private Network (EVPN), Open Shortest Path First (OSPF) parameters, Border Gateway Protocol (BGP) parameters, Protocol Independent Multicast (PIM) parameters, Switch Virtual Interface (SVI) parameters, and VXLAN parameters, such as tenant Virtual Routing and Forwarding (VRFs) and Virtual Local Area Networks (VLANs)mapped to specific Virtual Network Identifiers (VNIs). Remember, each of these are a dictionary with key/value pairs or a dictionary that contains a list of dictionaries.
touch your-ansible-nxos-path/roles/leaf/vars/main.yml
cat <<EOF >> your-ansible-nxos-path/roles/leaf/vars/main.yml

features:
  - { feature: bgp }
  - { feature: interface-vlan }
  - { feature: ospf }
  - { feature: pim }
  - { feature: vnseg_vlan }

ospf_process_id: UNDERLAY

ospf_area: 0

asn: 65001

address_families:
  - { afi: l2vpn, safi: evpn }
  - { afi: ipv4, safi: unicast }

bgp_neighbors:
  - { remote_as: 65001, neighbor: 10.10.10.11, update_source: Loopback0 }

rp_address: 1.1.1.1

vlans_l2vni:
  - { vlan_id: 11, vni_id: 10011, addr: 10.0.11.1, mask: 24, mcast_grp: 239.0.0.11, vrf: Tenant-1 }
  - { vlan_id: 12, vni_id: 10012, addr: 10.0.12.1, mask: 24, mcast_grp: 239.0.0.12, vrf: Tenant-1 }
  - { vlan_id: 13, vni_id: 10013, addr: 10.0.13.1, mask: 24, mcast_grp: 239.0.0.13, vrf: Tenant-1 }
  - { vlan_id: 14, vni_id: 10014, addr: 10.0.14.1, mask: 24, mcast_grp: 239.0.0.14, vrf: Tenant-1 }
  - { vlan_id: 15, vni_id: 10015, addr: 10.0.15.1, mask: 24, mcast_grp: 239.0.0.15, vrf: Tenant-1 }

vlans_l3vni:
  - { vlan_id: 10, vni_id: 10000, vrf: Tenant-1 }

vrfs:
  - { vrf: Tenant-1, vni_id: 10000, afi: ipv4, safi: unicast }
EOF
As previously mentioned, Cisco has the largest supported number of network modules, particularly for NXOS. In this lab module, you'll examine and make use of these Ansible Network modules for spine role tasks and leaf role tasks. The Ansible documentation for each network module provides a synopsis of what function the module performs and a table of parameters or keys. The tabulated parameters inform the user which parameters are required for the module to function as a task, which parameters are optional, and what the defaults are for parameters. There are many network modules that exist to configure VLANs, Interfaces, BGP, OSPF, PIM, VXLAN, etc. If a module does not exist, one particular module, called nxos_config, can be used to issue commands that do not have an existing module.
The tasks for the spine role will be compiled first. You can find a list of the NXOS network modules you'll be using below and the equivalent of what the CLI configuration commands would be beneath:
_> nxos_feature _> nxos_interfaces _> nxos_l3_interfaces _> nxos_ospf_interfaces _> nxos_pim_interface _> nxos_evpn_global _> nxos_bgp_global _> nxos_bgp_neighbor_address_family _> nxos_config
feature bgp
feature nv overlay
feature ospf
feature pim
nv overlay evpn
interface loopback0
    ip address 10.10.10.11/32
    ip pim sparse-mode
    ip router ospf UNDERLAY area 0
interface loopback1
    ip address 1.1.1.1/32
    ip pim sparse-mode
    ip router ospf UNDERLAY area 0
router bgp 65001
  router-id 10.10.10.11
  neighbor 10.10.10.21
    remote-as 65001
    update-source loopback0
    address-family l2vpn evpn
      send-community
      send-community extended
      route-reflector-client
  neighbor 10.10.10.22
    remote-as 65001
    update-source loopback0
    address-family l2vpn evpn
      send-community
      send-community extended
      route-reflector-client
For all the tasks below, you will use the graphical text editor gedit (or any text-editor of your choice) to build-out the main.yml file found in roles/spine/tasks/. Copy or type the Linux CLI to launch the spine task main.yml file in gedit.
gedit your-ansible-nxos-path/roles/spine/tasks/main.yml &
Copy the below nxos_feature task to enable the features you placed in the roles/spine/tasks/main.yml file that is opened in gedit. This task introduces another new concept in Ansible, loops. The loop parameter for looping through lists. If you remember, when you created the variables in roles/spine/vars/main.yml, a lot of the variables were defined as a dictionary of lists. Using loop, you can iterate over the lists and reference the keys (subkeys) by using item.subkey that specifies the value at that subkey location.
Throughout the build-out of the tasks main.yml file, you will use loop frequently to save on typing and to repeat tasks.
-   name: ENABLE FEATURES
    cisco.nxos.nxos_feature:
        feature: "{{item.feature }}"
    loop: "{{ features }}"

-   name: ENABLE FEATURES
    cisco.nxos.nxos_config:
        lines: "feature nv overlay"
Copy the below nxos_interfaces and nxos_l3_interfaces tasks to the roles/spine/tasks/main.yml file that is opened in gedit. This will make use of your defined Loopback variables in host_vars to configure the Loopbacks used for iBGP EVPN peering and the source of the NVE interface respectively.
-   name: CONFIGURE LOOPBACK INTERFACES
    cisco.nxos.nxos_interfaces:
        config:
        -   name: "{{ item.interface }}"
            enabled: true
    loop: "{{ loopbacks }}"

-   name: CONFIGURE INTERFACE IP ADDR
    cisco.nxos.nxos_l3_interfaces:
        config:
        -   name: "{{ item.interface }}"
            ipv4:
            -   address: "{{ item.addr }}/{{ item.mask }}"
    loop: "{{ loopbacks }}"
Copy the below nxos_ospf_vrf and nxos_ospf_interfaces tasks to the roles/spine/tasks/main.yml file that is opened in gedit. This task will use your variables in roles/spine/vars/main.yml and is used to configure OSPF interface parameters for the Loopbacks from the previous task into your OSPF process you created in Python.
-   name: ASSOCIATE INTERFACES WITH OSPF PROCESS
    cisco.nxos.nxos_ospf_interfaces:
        config:
        -   name: "{{ item.interface }}"
            address_family:
            -   afi: ipv4
                processes:
                -   process_id: "{{ ospf_process_id }}"
                    area:
                        area_id: "{{ ospf_area }}"
    loop: "{{ loopbacks }}"
Copy the below nxos_pim_interface task to the roles/spine/tasks/main.yml file that is opened in gedit. This will make use of your defined Loopback variables in host_vars to configure the Loopbacks into the PIM process.
-   name: CONFIGURE PIM INTERFACES
    cisco.nxos.nxos_pim_interface:
        interface: "{{ item.interface }}"
        sparse: true
    loop: "{{ loopbacks }}"
Copy the below nxos_evpn_global, nxos_bgp_global, nxos_bgp_neighbor_address_family tasks to the roles/spine/tasks/main.yml file that is opened in gedit. These tasks will use of your defined BGP variables in roles/spine/vars/main.yml to enable the BGP EVPN feature, configure the BGP process, configure the BGP neighbors to the Leaf VXLAN Tunnel Endpoint (VTEPs), and lastly, configure the BGP EVPN address-family under each neighbor as well as being a router-reflector client. Additionally, this will make use of your defined router id variable in host_vars to configure the BGP router-id.
-   name: ENABLE NV OVERLAY EVPN
    cisco.nxos.nxos_evpn_global:
        nv_overlay_evpn: true

-   name: CONFIGURE BGP ASN AND ROUTER ID
    cisco.nxos.nxos_bgp_global:
        config:
            as_number: "{{ asn }}"
            router_id: "{{ router_id }}"
            neighbors:
            -   neighbor_address: "{{ item.neighbor }}"
                remote_as: "{{ item.remote_as }}"
                update_source: "{{ item.update_source }}"
        state: merged
    loop: "{{ bgp_neighbors }}"

-   name: CONFIGURE BGP NEIGHBORS
    cisco.nxos.nxos_bgp_neighbor_address_family:
        config:
            as_number: "{{ asn }}"
            neighbors:
            -   neighbor_address: "{{ item.neighbor }}"
                address_family:
                -   afi: l2vpn
                    safi: evpn
                    send_community:
                        both: true
                    route_reflector_client: true
    loop: "{{ bgp_neighbors }}"
Copy the below nxos_config task to the roles/spine/tasks/main.yml file that is opened in gedit. You'll make use of this task to save your configuration using the nxos_config module's save parameter.
-   name: SAVE RUN CONFIG TO STARTUP CONFIG
    cisco.nxos.nxos_config:
        save_when: always
After successfully populating roles/spine/tasks/main.yml with all of the above tasks, click the Save button at the top right of the gedit window. Then, close the gedit application window.
The tasks for the leaf role will now be compiled. You can find a list of the NXOS network modules you'll be using below and the equivalent of what the CLI configuration commands would be beneath:
_> nxos_feature _> nxos_interfaces _> nxos_l3_interfaces _> nxos_ospf_interfaces _> nxos_pim_interface _> nxos_evpn_global _> nxos_bgp_global _> nxos_bgp_neighbor_address_family _> nxos_bgp_address_family _> nxos_vlans _> nxos_vrf _> nxos_vrf_af _> nxos_vrf_interface _> nxos_vxlan_vtep _> nxos_vxlan_vtep_vni _> nxos_evpn_vni _> nxos_config
feature ospf
feature bgp
feature pim
feature interface-vlan
feature nv overlay
feature vn-segment-vlan-based
vlan 10
  vn-segment 10000
vlan 11
  vn-segment 10011
interface loopback0
    ip address 10.10.10.21/32
    ip pim sparse-mode
    ip router ospf UNDERLAY area 0
interface loopback1
    ip address 2.2.2.1/32
    ip pim sparse-mode
    ip router ospf UNDERLAY area 0
vrf context Tenant-1
  vni 10000
  rd auto
  address-family ipv4 unicast
    route-target both auto evpn
router bgp 65001
  router-id 10.10.10.21
  neighbor 10.10.10.11
    remote-as 65001
    update-source loopback0
    address-family l2vpn evpn
      send-community
      send-community extended
  vrf Tenant-1
    address-family ipv4 unicast
      advertise l2vpn evpn
evpn
  vni 10011 l2
    rd auto
    route-target import auto
    route-target export auto
interface Vlan10
  no shutdown
  vrf member Tenant-1
  ip forward
interface Vlan11
  no shutdown
  vrf member Tenant-1
  ip address 10.0.11.1/24
  fabric forwarding mode anycast-gateway
interface nve1
  no shutdown
  source-interface loopback1
  host-reachability protocol bgp
  member vni 10000 associate-vrf
  member vni 10011
    mcast-group 239.0.0.11
For all the tasks below, you will continue using the graphical text editor gedit to build-out the main.yml file found in roles/leaf/tasks/. Copy or type the Linux CLI to launch the leaf task main.yml file in gedit.
gedit your-ansible-nxos-path/roles/leaf/tasks/main.yml &
Copy the below tasks into the roles/leaf/tasks/main.yml file that is opened in gedit. All the tasks below are the same used and explained for the above spine role tasks to configure the Loopback addresses for iBGP EVPN peering and the source interface for the Network Virtualization Edge (NVE) interface, configure the Loopback interface into OSPF and PIM, and configure BGP EVPN. These tasks use the variables defined in host_vars for the Leaf switches and the variables defined in the roles/leaf/vars/main.yml file.
-   name: ENABLE FEATURES
    cisco.nxos.nxos_feature:
        feature: "{{item.feature }}"
    loop: "{{ features }}"

-   name: ENABLE FEATURES
    cisco.nxos.nxos_config:
        lines: "feature nv overlay"

-   name: CONFIGURE LOOPBACK INTERFACES
    cisco.nxos.nxos_interfaces:
        config:
        -   name: "{{ item.interface }}"
            enabled: true
    loop: "{{ loopbacks }}"

-   name: CONFIGURE INTERFACE IP ADDR
    cisco.nxos.nxos_l3_interfaces:
        config:
        -   name: "{{ item.interface }}"
            ipv4:
            -   address: "{{ item.addr }}/{{ item.mask }}"
    loop: "{{ loopbacks }}"

-   name: ASSOCIATE INTERFACES WITH OSPF PROCESS
    cisco.nxos.nxos_ospf_interfaces:
        config:
        -   name: "{{ item.interface }}"
            address_family:
            -   afi: ipv4
                processes:
                -   process_id: "{{ ospf_process_id }}"
                    area:
                        area_id: "{{ ospf_area }}"
    loop: "{{ loopbacks }}"

-   name: CONFIGURE PIM INTERFACES
    cisco.nxos.nxos_pim_interface:
        interface: "{{ item.interface }}"
        sparse: true
    loop: "{{ loopbacks }}"

-   name: ENABLE NV OVERLAY EVPN
    cisco.nxos.nxos_evpn_global:
        nv_overlay_evpn: true

-   name: CONFIGURE BGP ASN, ROUTER ID, AND NEIGHBORS
    cisco.nxos.nxos_bgp_global:
        config:
            as_number: "{{ asn }}"
            router_id: "{{ router_id }}"
            neighbors:
            -   neighbor_address: "{{ item.neighbor }}"
                remote_as: "{{ item.remote_as }}"
                update_source: "{{ item.update_source }}"
        state: merged
    loop: "{{ bgp_neighbors }}"

-   name: CONFIGURE BGP NEIGHBOR AFI, SAFI, COMMUNITY, and RR
    cisco.nxos.nxos_bgp_neighbor_address_family:
        config:
            as_number: "{{ asn }}"
            neighbors:
            -   neighbor_address: "{{ item.neighbor }}"
                address_family:
                -   afi: l2vpn
                    safi: evpn
                    send_community:
                        both: true
                    route_reflector_client: true
    loop: "{{ bgp_neighbors }}"
Copy the below nxos_vlans task to the roles/leaf/tasks/main.yml file that is opened in gedit. You'll make use of this task to create VLANs on the VTEPs and map the VLANs to their corresponding VNIs. Using the with_items you'll iterate over the list of VLANs that map both to the L2VNI and the L3VNI (Tenant VRF VNI).
-   name: CONFIGURE VLAN TO VNI MAPPING
    cisco.nxos.nxos_vlans:
        config:
        -   vlan_id: "{{ item.vlan_id }}"
            mapped_vni: "{{ item.vni_id }}"
    with_items:
    - "{{ vlans_l2vni }}"
    - "{{ vlans_l3vni }}"
Copy the below nxos_vrf and nxos_vrf_af tasks to the roles/leaf/tasks/main.yml file that is opened in gedit. These tasks will create the tenant VRF, map the L3VNI to the tenant VRF, and set the Route Distinguisher (RD) and Route Target (RT) to auto since this lab is making use of iBGP EVPN.
-   name: CONFIGURE TENANT VRFs
    cisco.nxos.nxos_vrf:
        vrf: "{{ item.vrf }}"
        vni: "{{ item.vni_id }}"
        rd: auto
        state: present
    loop: "{{ vrfs }}"

-   name: CONFIGURE TENANT VRFs (cont'd)
    cisco.nxos.nxos_vrf_af:
        vrf: "{{ item.vrf }}"
        afi: ipv4
        route_target_both_auto_evpn: true
        state: present
    loop: "{{ vrfs }}"
Copy the below nxos_interfaces, nxos_vxlan_vtep, and nxos_vxlan_vtep_vni tasks to the roles/leaf/tasks/main.yml file that is opened in gedit. The nxos_interfaces module is used to create and configure an interface and set its admin state. The nxos_vxlan_vtep module is used to set the NVE interface source interface and to use BGP EVPN as the control plane by setting host_reachability to true. The last task module, nxos_vxlan_vtep_vni, is used to map the Layer 2 Virtual Network Interface (L2VNI) and Layer 3 Virtual Network Interface (L3VNI) to the NVE interface.
-   name: CONFIGURE VXLAN VTEP NVE INTERFACE
    cisco.nxos.nxos_interfaces:
        config:
        -   name: nve1
            enabled: true
        state: merged

-   name: CONFIGURE VXLAN VTEP NVE INTERFACE FOR EVPN CONTROL PLANE
    cisco.nxos.nxos_vxlan_vtep:
        interface: nve1
        host_reachability: true
        source_interface: Loopback1
        state: present

-   name: CONFIGURE VXLAN VTEP NVE INTERFACE L2VNI MAPPING
    cisco.nxos.nxos_vxlan_vtep_vni:
        interface: nve1
        vni: "{{ item.vni_id }}"
        #ingress_replication: bgp
        multicast_group: "{{ item.mcast_grp }}"
        #suppress_arp: true
    loop: "{{ vlans_l2vni }}"

-   name: CONFIGURE VXLAN VTEP NVE INTERFACE L3VNI MAPPING
    cisco.nxos.nxos_vxlan_vtep_vni:
        interface: nve1
        vni: "{{ item.vni_id }}"
        assoc_vrf: true
    loop: "{{ vlans_l3vni }}"
Copy the below nxos_evpn_vni task to the roles/leaf/tasks/main.yml file that is opened in gedit. This task adds the L2 VRF for the L2VNI configuration to BGP EVPN. Because this lab makes use of iBGP EVPN, the RD and RT use the auto feature.
-   name: CONFIGURE L2 EVPN VRFs
    cisco.nxos.nxos_evpn_vni:
        vni: "{{ item.vni_id }}"
        route_distinguisher: auto
        route_target_both: auto
    loop: "{{ vlans_l2vni }}"
Copy the below nxos_bgp_address_family task to the roles/leaf/tasks/main.yml file that is opened in gedit. This task is used to configure the tenant VRF under the BGP process.
-   name: CONFIGURE TENANT VRFs UNDER BGP PROCESS
    cisco.nxos.nxos_bgp_address_family:
        config:
            as_number: "{{ asn }}"
            address_family:
            -   afi: "{{ item.afi }}"
                safi: "{{ item.safi }}"
                vrf: "{{ item.vrf }}"
                advertise_l2vpn_evpn: true
    loop: "{{ vrfs }}"
Copy the below nxos_overlay_global task to the roles/leaf/tasks/main.yml file that is opened in gedit.
-   name: CONFIGURE ANYCAST GW MAC
    cisco.nxos.nxos_overlay_global:
        anycast_gateway_mac: "1234.5678.9000"
Copy the below tasks to the roles/leaf/tasks/main.yml file that is opened in gedit. .
-   name: CONFIGURE SVIs THAT ARE MAPPED TO VNIs
    cisco.nxos.nxos_interfaces:
        config:
        -   name: "Vlan{{ item.vlan_id }}"
            enabled: true
    with_items:
    - "{{ vlans_l2vni }}"
    - "{{ vlans_l3vni }}"

-   name: ASSOCIATE INTERFACES TO TENANT VRF
    cisco.nxos.nxos_vrf_interface:
        vrf: "{{ item.vrf }}"
        interface: "vlan{{ item.vlan_id }}"
    with_items:
    - "{{ vlans_l2vni }}"
    - "{{ vlans_l3vni }}"

-   name: ENABLE ANYCAST GW UNDER L2VNI SVI
    cisco.nxos.nxos_interfaces:
        config:
        -   name: "Vlan{{ item.vlan_id }}"
            fabric_forwarding_anycast_gateway: true
    loop: "{{ vlans_l2vni }}"

-   name: CONFIGURE IP FORWARD UNDER L3VNI SVI
    cisco.nxos.nxos_interfaces:
        config:
        -   name: "vlan{{ item.vlan_id }}"
            ip_forward: true
    loop: "{{ vlans_l3vni }}"

-   name: CONFIGURE IP ADDRESS TO L2VNI SVI
    cisco.nxos.nxos_l3_interfaces:
        config:
        -   name: "Vlan{{ item.vlan_id }}"
            ipv4:
            -   address: "{{ item.addr }}/{{ item.mask }}"
    loop: "{{ vlans_l2vni }}"
Copy the below nxos_config task to the roles/leaf/tasks/main.yml file that is opened in gedit. You'll make use of this task to save your configuration using the nxos_config module's save parameter.
-   name: SAVE RUN CONFIG TO STARTUP CONFIG
    cisco.nxos.nxos_config:
        save_when: always
After successfully populating roles/leaf/tasks/main.yml with all of the above tasks, click the Save button at the top right of the gedit window. Then, close the gedit application window.
Up to this point, you have installed Ansible, created the Ansible playbook directory structure and used roles as a part of that structure to define different devices, you have defined variables within YAML files of that directory structure for both universal and role specific use, and you have created the tasks for both the spine and leaf roles that the playbook will execute using Ansible network modules and the variables you defined.
Some additional files as part of the Ansible directory structure need to created before you can kickoff the execution of your Ansible playbook to finish deploying your VXLAN EVPN fabric. You need to define the devices or hosts which you want the playbook to run against and you also need to define the playbook such that you run more than one play, i.e. use our roles and tasks define in the previous section.
Ansible refers to it's host file as an inventory file. The inventory file has a default location in /etc/ansible/hosts, but can also be specified directly within a playbook locally and used with the -i hosts option, where hosts happens to be the inventory file name. Within the inventory file, you can simply list all the devices/hosts or make use of group names using brackets which classifies devices you are controlling at what times and for what purpose.
Copy or type the below inventory host file.
cat <<EOF >> your ansible-nxos-path/hosts
# hosts file for Ansible playbook

[spine]
10.1.10.11

[leaf]
10.1.10.21
10.1.10.22
EOF
As previously mentioned, Ansible calls it's configuration and orchestration framework "playbooks" and is a collections of "play(s)" or tasks for configuration management and deployment to a device or multiple devices. While playbooks can be represented as a single file, Ansible best practices recommend a particular directory structure for playbooks that you built using roles for better organization and reuse. You built all of this over the last three sections. You now need to build the main playbook file, which would look like the below:
The below playbook file you will use for this lab designates the following behaviors, for each role ‘x’:
> If roles/x/tasks/main.yml exists, tasks listed therein will be added to the play > If roles/x/handlers/main.yml exists, handlers listed therein will be added to the play > If roles/x/vars/main.yml exists, variables listed therein will be added to the play > If roles/x/defaults/main.yml exists, variables listed therein will be added to the play > If roles/x/meta/main.yml exists, any role dependencies listed therein will be added to the list of roles (1.3 and later) > Any copy, script, template or include tasks (in the role) can reference files in roles/x/{files,templates,tasks}/ (dir depends on task) without having to path them relatively or absolutely
Copy or type the main playbook YAML file.
cat <<EOF >> your ansible-nxos-path/site.yml
---
# main playbook

- hosts: spine
  roles:
    - role: spine

- hosts: leaf
  roles:
    - role: leaf
EOF
To execute an Ansible playbook you simply just use ansible-playbook. You are going to use our own host file, so you must specify -i hosts, where -i is for inventory and hosts is the inventory file name. Lastly, you must specify the playbook file, site.yml.
cd your ansible-nxos-path/
ansible-playbook -i hosts site.yml
Alternatively, you can add -vvv for verbose debugging output for each task that is executed.
Upon successful execution of this playbook, the spine and leaf roles, and the tasks and variables defined in each, will configure VXLAN EVPN VLANs, VNIs, SVIs, Tenant VRFs, etc.
Login to your N9K switches to view the configuration that was pushed to the switches. Use the verification commands for each device below to verify what Ansible did. Note, only one VTEP will be shown as the VTEP configuration, aside from IP addressing, is identical:
Spine-S1
show run ospf:
feature ospf

router ospf UNDERLAY
  router-id 10.10.10.11

interface loopback0
  ip router ospf UNDERLAY area 0.0.0.0

interface loopback1
  ip router ospf UNDERLAY area 0.0.0.0

interface Ethernet1/1
  ip router ospf UNDERLAY area 0.0.0.0

interface Ethernet1/2
  ip router ospf UNDERLAY area 0.0.0.0
show run pim:
feature pim

ip pim rp-address 1.1.1.1 group-list 224.0.0.0/4
ip pim ssm range 232.0.0.0/8


interface loopback0
  ip pim sparse-mode

interface loopback1
  ip pim sparse-mode

interface Ethernet1/1
  ip pim sparse-mode

interface Ethernet1/2
  ip pim sparse-mode
show run bgp:
feature bgp

router bgp 65001
  router-id 10.10.10.11
  neighbor 10.10.10.21
    remote-as 65001
    update-source loopback0
    address-family l2vpn evpn
      send-community
      send-community extended
      route-reflector-client
  neighbor 10.10.10.22
    remote-as 65001
    update-source loopback0
    address-family l2vpn evpn
      send-community
      send-community extended
      route-reflector-client
show ip ospf neighbors:
OSPF Process ID UNDERLAY VRF default
Total number of neighbors: 2
Neighbor ID     Pri State            Up Time  Address         Interface
10.10.10.21           1 FULL/DR          07:59:55 10.1.1.1        Eth1/1
10.10.10.22           1 FULL/DR          07:59:54 10.1.1.3        Eth1/2
show ip pim neighbor:
PIM Neighbor Status for VRF "default"
Neighbor        Interface            Uptime    Expires   DR       Bidir-  BFD
                                                        Priority Capable State
10.1.1.1        Ethernet1/1          01:43:15  00:01:39  1        yes     n/a
10.1.1.3        Ethernet1/2          01:43:15  00:01:19  1        yes     n/a
show bgp l2vpn evpn summary:
BGP summary information for VRF default, address family L2VPN EVPN
BGP router identifier 10.10.10.11, local AS number 65001
BGP table version is 8, L2VPN EVPN config peers 2, capable peers 2
0 network entries and 0 paths using 0 bytes of memory
BGP attribute entries [0/0], BGP AS path entries [0/0]
BGP community entries [0/0], BGP clusterlist entries [0/0]

Neighbor        V    AS MsgRcvd MsgSent   TblVer  InQ OutQ Up/Down  State/PfxRcd
10.10.10.21     4 65001     157     159        8    0    0 02:29:57 0
10.10.10.22     4 65001     157     159        8    0    0 02:29:56 0
Leaf-L1
show run ospf:
feature ospf

router ospf UNDERLAY
  router-id 10.10.10.21

interface loopback0
  ip router ospf UNDERLAY area 0.0.0.0

interface loopback1
  ip router ospf UNDERLAY area 0.0.0.0

interface Ethernet1/1
  ip router ospf UNDERLAY area 0.0.0.0
show run pim:
feature pim

ip pim rp-address 1.1.1.1 group-list 224.0.0.0/4
ip pim ssm range 232.0.0.0/8


interface loopback0
  ip pim sparse-mode

interface loopback1
  ip pim sparse-mode

interface Ethernet1/1
  ip pim sparse-mode
show run bgp:
feature bgp

router bgp 65001
  router-id 10.10.10.21
  neighbor 10.10.10.11
    remote-as 65001
    update-source loopback0
    address-family l2vpn evpn
      send-community
      send-community extended
  vrf Tenant-1
    address-family ipv4 unicast
      advertise l2vpn evpn
evpn
  vni 10011 l2
    rd auto
    route-target import auto
    route-target export auto
  vni 10012 l2
    rd auto
    route-target import auto
    route-target export auto
  vni 10013 l2
    rd auto
    route-target import auto
    route-target export auto
  vni 10014 l2
    rd auto
    route-target import auto
    route-target export auto
  vni 10015 l2
    rd auto
    route-target import auto
    route-target export auto
vrf context Tenant-1
  rd auto
  address-family ipv4 unicast
    route-target both auto evpn
show run vrf tenant-1:
interface Vlan10
  vrf member Tenant-1

interface Vlan11
  vrf member Tenant-1

interface Vlan12
  vrf member Tenant-1

interface Vlan13
  vrf member Tenant-1

interface Vlan14
  vrf member Tenant-1

interface Vlan15
  vrf member Tenant-1
vrf context Tenant-1
  vni 10000
  rd auto
  address-family ipv4 unicast
    route-target both auto evpn
router bgp 65001
  vrf Tenant-1
    address-family ipv4 unicast
      advertise l2vpn evpn
show run vlan:
vlan 1,10-15
vlan 10
  vn-segment 10000
vlan 11
  vn-segment 10011
vlan 12
  vn-segment 10012
vlan 13
  vn-segment 10013
vlan 14
  vn-segment 10014
vlan 15
  vn-segment 10015
show run int vlan 10-15:
interface Vlan10
  no shutdown
  vrf member Tenant-1
  ip forward

interface Vlan11
  no shutdown
  vrf member Tenant-1
  ip address 10.0.11.1/24
  fabric forwarding mode anycast-gateway

interface Vlan12
  no shutdown
  vrf member Tenant-1
  ip address 10.0.12.1/24
  fabric forwarding mode anycast-gateway

interface Vlan13
  no shutdown
  vrf member Tenant-1
  ip address 10.0.13.1/24
  fabric forwarding mode anycast-gateway

interface Vlan14
  no shutdown
  vrf member Tenant-1
  ip address 10.0.14.1/24
  fabric forwarding mode anycast-gateway

interface Vlan15
  no shutdown
  vrf member Tenant-1
  ip address 10.0.15.1/24
  fabric forwarding mode anycast-gateway
show nve vni:
Codes: CP - Control Plane        DP - Data Plane
       UC - Unconfigured         SA - Suppress ARP

Interface VNI      Multicast-group   State Mode Type [BD/VRF]      Flags
--------- -------- ----------------- ----- ---- ------------------ -----
nve1      10000    n/a               Up    CP   L3 [Tenant-1]
nve1      10011    239.0.0.11        Up    CP   L2 [11]
nve1      10012    239.0.0.12        Up    CP   L2 [12]
nve1      10013    239.0.0.13        Up    CP   L2 [13]
nve1      10014    239.0.0.14        Up    CP   L2 [14]
nve1      10015    239.0.0.15        Up    CP   L2 [15]
show ip ospf neighbors:
OSPF Process ID UNDERLAY VRF default
Total number of neighbors: 1
Neighbor ID     Pri State            Up Time  Address         Interface
10.10.10.11           1 FULL/BDR         07:53:13 10.1.1.0        Eth1/1
show ip pim neighbor:
PIM Neighbor Status for VRF "default"
Neighbor        Interface            Uptime    Expires   DR       Bidir-  BFD
                                                        Priority Capable State
10.1.1.0        Ethernet1/1          01:36:33  00:01:32  1        yes     n/a
show bgp l2vpn evpn summary:
BGP summary information for VRF default, address family L2VPN EVPN
BGP router identifier 10.10.10.21, local AS number 65001
BGP table version is 3, L2VPN EVPN config peers 1, capable peers 1
0 network entries and 0 paths using 0 bytes of memory
BGP attribute entries [0/0], BGP AS path entries [0/0]
BGP community entries [0/0], BGP clusterlist entries [0/0]

Neighbor        V    AS MsgRcvd MsgSent   TblVer  InQ OutQ Up/Down  State/PfxRcd
10.10.10.11     4 65001     152     151        3    0    0 02:23:15 0