Telemetry over gRPC Secure Channel
To start a gRPC secure connection a server certificate and key must be created and uploaded to the device profile of the router receiving the stream from. The instructions below may not match the router exactly so look up the associated documentation the streaming device.
Create an ssl.conf file:
[req]
distinguished_name = req_distinguished_name
req_extensions = v3_req
[req_distinguished_name]
countryName                 = Country Name (2 letter code)
countryName_default         = CA
stateOrProvinceName         = State or Province Name (full name)
stateOrProvinceName_default = Some-State
localityName                = Name (eg, city)
localityName_default        = Kanata
organizationName            = Organization Name (eg, company)
organizationName_default    = Cisco
commonName                  = Common Name
commonName_max              = 64
commonName_default          = grpc

[v3_req]
subjectAltName = @alt_names

[alt_names]
IP.1 = 10.19.198.133
Create a Private key for certificate authority:
openssl genrsa -out myca.key 2048
Create a Private key for the receiver (yangsuite):
openssl genrsa -out server.key 2048
Create the CA certificate (signs requests for receiver certificate):
openssl req -x509 -new -nodes -key myca.key -sha256 -days 365 -out myca.cert
Create receiver certificate request:
openssl req -out server.csr -key server.key -new -config ./ssl.conf
Take receiver request and produce certificate for receiver:
openssl x509 -req -in server.csr -CA myca.cert -CAkey myca.key -CAcreateserial -out server.cert -days 365 -extensions v3_req -extfile ./ssl.conf
Typical configuration for a trustpoint:
conf t
crypto pki trustpoint grpc-receiver
enrollment terminal
chain-validation stop
revocation-check  none
exit
crypto pki authenticate grpc-receiver
PASTE IN: contents of myca.cert
Typical telemetry configuration (set protocol to grpc-tls):
telemetry ietf subscription 222
 encoding encode-kvgpb
 filter xpath /process-cpu-ios-xe-oper:cpu-usage/cpu-utilization/five-seconds
 source-address 172.27.255.22
 source-vrf Mgmt-vrf
 stream yang-push
 update-policy periodic 2000
 receiver ip address 10.10.10.10 50070 protocol grpc-tls profile myca
Upload server certificate and key to device Profile
Go to the “Setup –> Device profile” page from the main menu. Select the configured device profile of the router you will receive the TLS Telemetry stream from and upload server.cert file to the “TLS Server Certificate” field and the server.key to the “TLS Server Key” field.
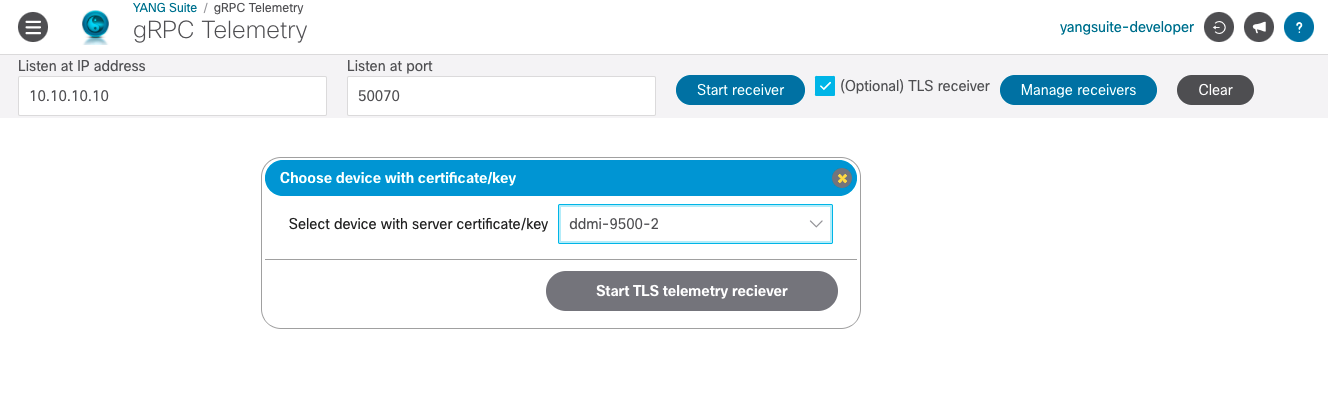
Starting the TLS secure channel receiver
On the YANG Suite page, enter the IP address and TCP port the stream will come in on and check the checkbox labeled “(Optional) TLS receiver”. A dialog box will pop up asking you to choose the device profile where you uploaded the server certificate and key to. Click on “Start TLS telemetry receiver”.
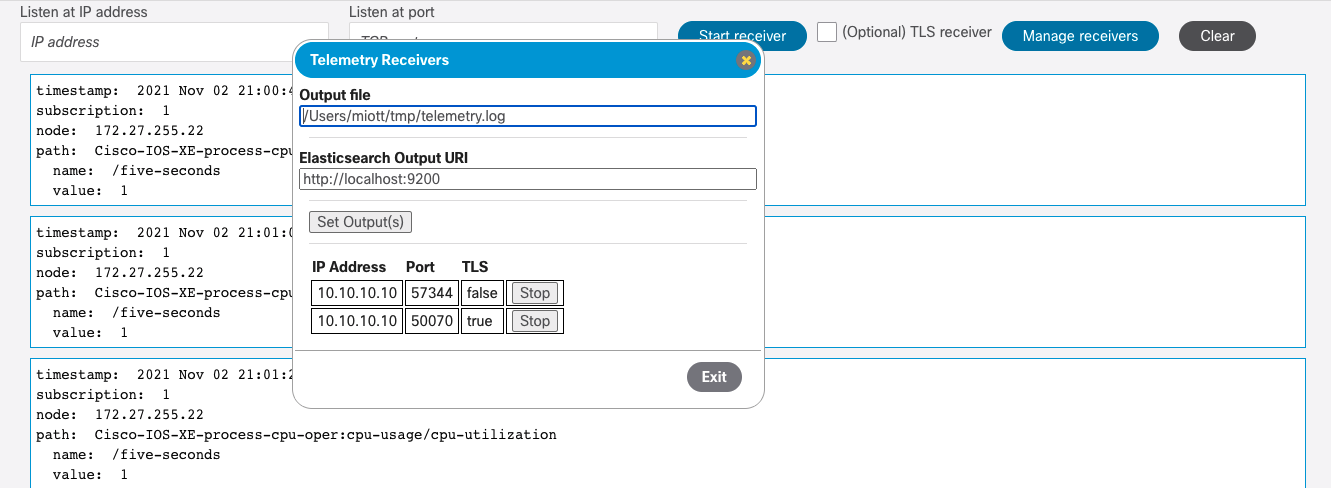
Managing receiver start/stop and output
Click on “Manage receiver” to see what receivers are live on the YANG Suite server. By default, all telemetry messages are sent to the YANG Suite web page. There are also choices to send the output to a file and/or a running instance of Elasticsearch. For file output, enter the full path of the file targeted for output. The directory must exist, however, the file will be created if it does not exist or appeded if it does. To send the output to [Elasticsearch], enter the URI where it is running. Click on “Set output(s)” to begin optional output target. Click on the “Stop” button next to the receiver you wish to stop.
[Elasticsearch]:https://www.elastic.co/