Plugin Implementation
Unicon plugins are the actual implementation, which defines the connections class, services and state machine for the platform it is implementing. Unicon provides a Connection factory class which will load these plugin based on the input parameters
There are two methods of writing plugins for Unicon.
by contributing directly to
unicon.pluginssource code underunicon.plugins repository, and following the folder structure and examples there.by writing your own package, which installs using
pipand extends Unicon functionality without having to modify the core Unicon code.
Both methods have their pros & cons. See below for details.
Contribution
Any plugins contributed to Unicon code under the unicon.plugins repository,
becomes part of Unicon. This is a great method to use if your plugin
is generic, since it is installed automatically as part of every Unicon installation.
Doing so requires you to follow Unicon development and unittest guidelines, and ultimately submit a pull-request to the Unicon source code repository. Once verified by its developers, the next version of Unicon release will incorporate your plugin.
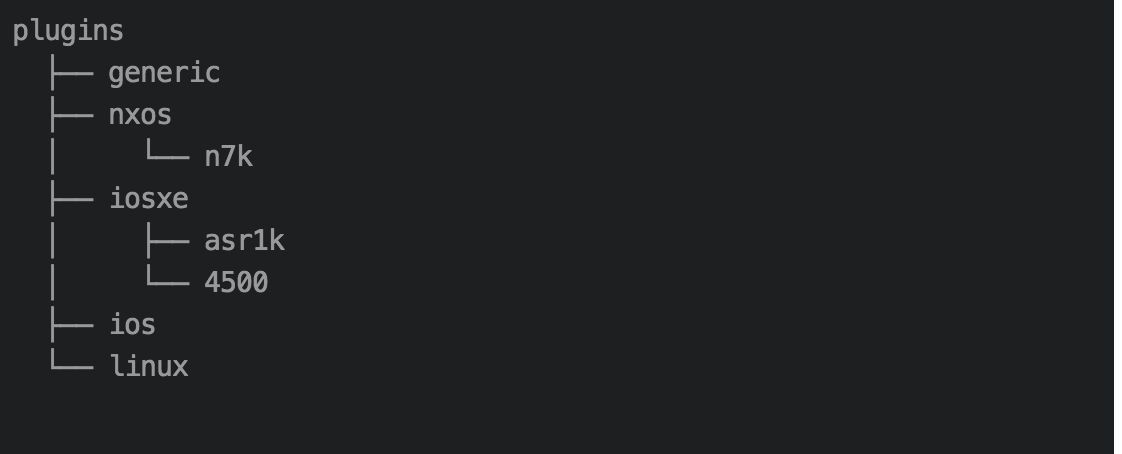
Under this repository, Unicon follows a hierarchical directory structure for writing
plugins, which is distributed based on the OS, platform, model of the platform
which the plugin implements. Any new OS implementations will contribute to a
new sub-directory under unicon.plugins/plugins and its platform/model will go under that.
Unicon also has a generic plugin which implements the common behaviour seen across
various platform. For any unknown or not implemented os, unicon loads
generic plugin and uses its Connection, also generic platform will be used as
a reference/starting point for new platform implementation.
Recommendations :
We strictly recommend to follow generic plugins file and class structure while implementing your new platforms.
Also it is highly recommended to use the generic plugins Statemachine and services as the base class for your implementations statemachine and services.
Writing Your own Plugin
If all you are looking for is to write plugins that support your own platforms without modifying the original Unicon code
If you wish to own and support your own Unicon plugin that’s installable via
pip
You should look into creating your own Unicon plugin package. Note that by
following this route, your new plugin will not be installed by default when
other developers perform pip install Unicon, and will have to install your
plugin separately.
There are few major steps involved in creating your own plugin package:
create the plugin module content following the instructions on this page on how to create a plugin.
Note
make sure the
__init__.pyof your top-level package imports and/or contains the implementedConnectionplugin class.create the plugin package by writing a
setup.pysetup script. There are lots of online resources on this topic, eg Writing a Setup Script.inside your new
setup.py, make sure to declare the following:setup( #... entry_points = {'unicon.plugins': ['<platform_name> = <module_name>']}, #... )and replace
<platform_name>with your platform’s string name, and<module_name>being the name of plugin module you developed.Note
valid plugin platform names:
[A-Za-z_0-9]+this will ensure the plugin gets discovered by Unicon upon import. If you are including multiple plugins within the same plugin package, simply further populate the list:
setup(
    #...
    entry_points = {'unicon.plugins': [
                            '<platform_name_1> = <module_name_1>',
                            '<platform_name_2> = <module_name_2>',
                            # ... etc
                    ]},
    #...
)
And voila! Once your plugin is installed (either via pip install or
python setup.py develop for development mode), it will be loaded
automatically by Unicon.
For more details, follow the detailed Unicon plugin example presented at https://github.com/CiscoDevNet/pyats-plugin-examples.
Implementing a New Platform
Creating a Unicon plugin for a new platform can be sub divided into four main steps,
- Creating a Connection Class:
Defines all the attributes required for this connection.
- Writing Connection Provider:
Provides methods to connect and disconnect this platform
- Creating State Machine:
Defines all the supported states for this platform and handles state transitions
- Creating all required Services:
Defines all the supported services for this platform
Connection class
Connection class serves as the starting point for the device connection. Unicon PluginManager is based on the platform to create the right connection class, which in turn initializes all its required components, such as connection provider, state machine, supported services and etc.
Users implementing a new platform have to define a Connection class, with the required
parameters which are listed below in this section. The new Connection class
should satisfy the following conditions
It should be subclass (direct or indirect) of
Connection,``BaseSingleRpConnection``or``BaseDualRpConnection``
Connectionfollows class hierarchy which is aligned/derived according to the os, platform and modelBased the chassis type, there should be a separate definition of the class
The Connection class takes the following mandatory parameters
Parameter |
Description |
|---|---|
os |
OS for which the implementation is intended |
platform |
Platform of this implementation |
model |
Model which this implementation supports |
chassis_type |
Hardware chassis type single_rp, dual_rp or stack |
connection_provider_class |
Class which implements actual step for connecting to a device |
state_machine_class |
State machine to be used |
subcommand_list |
List of subcommand supported |
settings |
Settings to be used for this connection |
os``and``chassis_type of the implementation has to be mentioned in the connection.
# Example Connection class Nxos single Rp connection
class NxosSingleRpConnection(BaseSingleRpConnection):
  os = 'nxos'
  platform = None
  chassis_type = 'single_rp'
  state_machine_class = NxosSingleRpStateMachine
  connection_provider_class = NxosSingleRpConnectionProvider
  subcommand_list = NxosServiceList
  settings = NxosSettings()

# Example Connection class Nxos Dual Rp connection
class NxosDualRPConnection(BaseDualRpConnection):
  os = 'nxos'
  platform = None
  chassis_type = 'dual_rp'
  state_machine_class = NxosDualRpStateMachine
  connection_provider_class = NxosDualRpConnectionProvider
  subcommand_list = HANxosServiceList
  settings = NxosSettings()
Base Connection (e.g BaseSingleRpConnection
and BaseDualRpConnection) classes of
unicon defines the workflow of Connection and it satisfies all common needs of
router connection, the user may not need to override any of the methods unless there is
specific scenario to handle.
Connection Provider
The connection class for any platform depends on the connection provider for initiating a connection. As the name suggests, their role is to provide a method to let the application connect and disconnect to the device.
This class provides two essential methods, namely connect``and``disconnect.
The connect method defines all the steps involved in the connection process, which are
defined as separate methods. These steps vary
depending on the chassis type and the device, changing the behaviour of these
can be achieved by overriding the method corresponding to each step.
- In the case of singleRP the steps involved in the connection process are:
get_connection_dialog
establish_connection
init_handle
This is handled by the
BaseSingleRpConnectionProviderclass.
Whereas DualRp does a few additional steps like designate handles, initialize/unlock standby, and assign ha mode.
This is handled by the
BaseDualRpConnectionProviderclass.
Pattern
For all patterns used by match_buffer, eg. dialog, statemachine, expect,
by default, pty_backend match_buffer will detect the match mode.
It can be turned off by passing match_mode_detect=False to spawn or by changing settings.
Rules:
search the whole buffer with re.DOTALL if:
pattern contains any of: r’n’, r’r’, .
pattern equals to any of: r’.*’, r’^.*$’, r’.*$’, r’^.*’, r’.+’, r’^.+$’, r’.+$’, r’^.+’
If the pattern ends with ‘$’ but not r’\$’, match_buffer will only match the last line
In other situations, search the whole buffer with re.DOTALL
StateMachine
The State Machine class holds the details of all supported states for a platform
and handles the transition of the device to different states.
Each platform has their own state machine class. The State Machine class provides
a create method where all the device states have to be created.
The State Machine should be sub class of StateMachine class from
unicon.statemachine
# State Machine for Nxos singleRP
class NxosSingleRpStateMachine(StateMachine):

  def create(self):
      self.add_state(State('enable', '^.*%N#')); #%N here refers to hostname of device
      self.add_state(State('config', '^.*%N(config)#'))

      # Create a path
      self.create_path(enable, config, 'config term', None)
      self.create_path(config, enable, 'end', None)
Creating New Services
Refer detailed document How to write a new Service
Settings
Unicon Connection behavior can be changed by modifying its settings. The default
settings for unicon is ‘unicon.setting.Settings’, users can inherit and
change these settings if they wish to provide any platform or plugin level
setting. Unicon Connection class takes additional input settings, which
can be used to provide plugin/platform level settings.
from unicon.settings import Settings
class NxosSettings(Settings):
    def __init__(self):
        super().__init__()
        # Modify settings here
        self.EXEC_TIMEOUT = 100
Recommendations :
We strictly recommend to follow the generic plugins file and class structure while implementing your new platforms.
It is also highly recommended to use the generic plugins Statemachine and services as the base class for your implementation’s statemachine and services.
Consider adding the DEFAULT_HOSTNAME_PATTERN attribute to the Settings object for the
learn_hostname feature to work. Refer learn_hostname feature support requirements.