Genie Harness Recipes
Note
This section assumes pyATS and Genie are installed and ready to be used.
Note
It also assumes you have a testbed file ready to be used with a device.
1. Summary
Note
This section gives a summary of what is Genie Harness. Dig into the documentation for more information.
Writing a future-proof automation script is a complex topic. It seems simple at first, but then as the devices update, things changes, there are new requirement and it all become spaghetti; and the whole process restarts again.
With Genie harness, we’ve taken this complex topic and made it simple. We’ve taken a divide and conquer approach to this problem. Multiple packages and libraries were created with Genie harness being the last piece to create a resilient and future-proof automation solution. In short, we’ve made lasagna with many modules stacked on top of each other.
Genie harness provides comprehensive common tools so that users can focus on writing tests without having to reinvent the wheel!
Once the tests are written, the harness is then driven by yaml datafiles. The files control the whole flow of the execution:
snapshot of the configuration and compared at the end of the run
snapshot of the operation state of your devices to be compared at the end of the run
:triggers:`pool of available tests <http>` (triggers and verifications, over 500) which works across multiple Operating systems
connections pool - Learn and send commands to the device in parallel
much more
Genie Harness is fully modular; everything can be customized; modified for your automation need.
New subsections can be added and removed
Decide which triggers and verifications to execute and in which order
Create your own triggers and verifications
Add local verifications to any trigger
Add processor anywhere
Static information for each trigger
Much more!
2. What’s the flow of Genie Harness
The flow of Genie Harness is divided into 3 main sections.
Common Setup
Get the devices ready and collect some information:
Connect to your devices
Configure your device (optional)
Setup Traffic Generator if needed
Take a snapshot of the system
Triggers and Verifications
Execute triggers and verification to perform tests on your devices.
Common Cleanup
Make sure the state of the devices are the same as in common Setup
a. Take a new snapshot and compare with the original snapshots from Common Setup b. Stop traffic
Note
You can add your own subsections within the common setup and cleanup.
The triggers and verifications are where the action is happening! Let’s first define trigger and verification.
Trigger: Perform actions on the device to test it. In most case the the state of the device is reverted to what it was before the trigger started.
Verifications: The first time a verification is run, it takes a snapshot of some commands; the next time, the same command is executed and compare with this initial snapshot to make sure the state has not changed.
Global Verification: A Global verifications are run between each trigger. (Optional)
Local Verification: Independent of the Global verifications, only run within a trigger with a new snapshot taken at the beginning of the trigger. (Optional)
The first time a Global or a Local verification is executed, a snapshot is taken and subsequent verifications then compare with this snapshot.
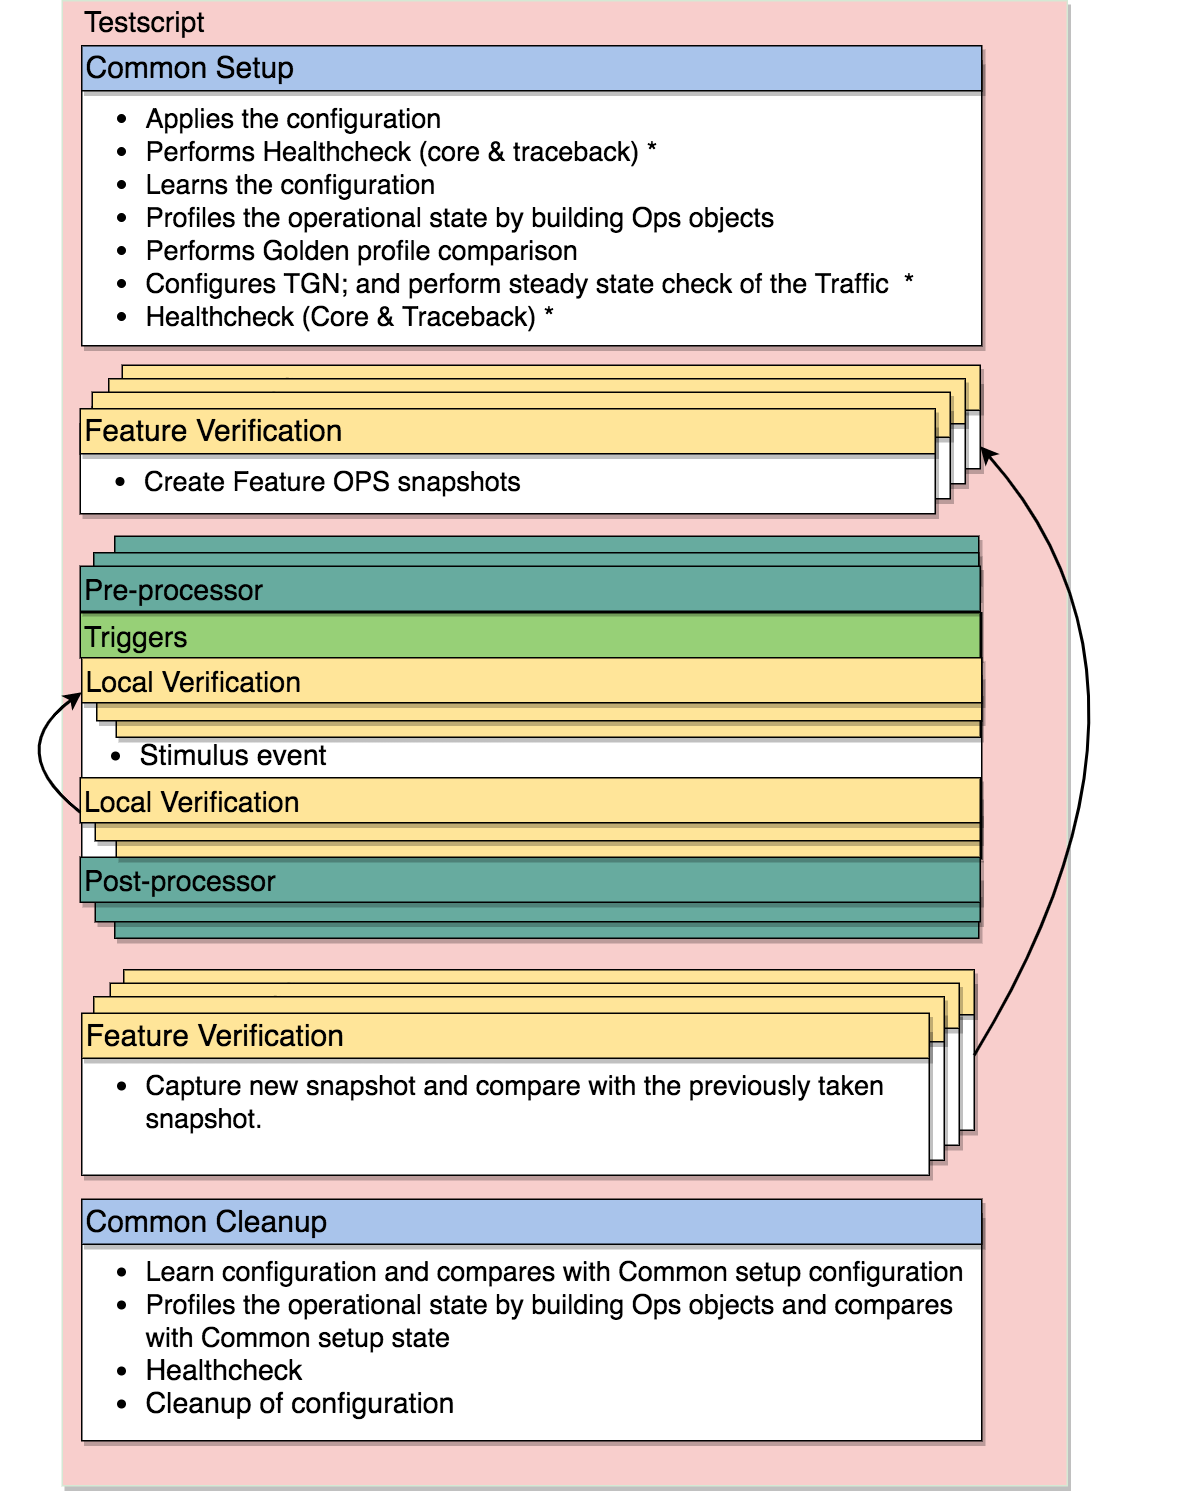
Within the Common Setup, features can also be profiled. The profile takes an ops snapshot, which is then compared in the Common Cleanup. This is very powerful to find any unexpected side effect to some feature.
Note
A verification can also be callable, where you decide what should pass and fail.
Note
This is the typical Harness flow, however, everything can be customized
3. Getting started with the Harness
To execute your first Genie you need the following three items.
testbed file
Follow the testbed file ready.
job file
A job file starts the execution of Genie.
import os

from pyats.datastructures.logic import And, Not, Or
from genie.harness.main import gRun

def main():

    # trigger_uids limit which test to execute
    # verification_uids limit which test to execute
    gRun(trigger_uids=['TriggerSleep'],
         verification_uids=['Verify_InterfaceBrief'])
pyats run <job file>.py --testbed-file <path to testbed file>
This will run Genie with 1 trigger and 1 verification.
Note
This is very similar to the first Genie Examples.
4. Summary of each datafile
Genie uses at most 7 datafiles.
Testbed Datafile (Mandatory)
The testbed datafile describes the testbed information. Available devices, how to connect to them, server, interfaces, etc.
Mapping Datafile (Optional)
The mapping datafile create the relation between the testbed datafile and Genie,
it is only needed if user wants to connect to multiple devices controling the
connection type for each device. Otherwise, Genie will only connect to uut.
Verification Datafile (Optional)
The verification datafile contains all the information on the verifications.
If no verification datafile is provided, the default datafile
$VIRTUAL_ENV/lib/python<version>/site-packages/genie/libs/sdk/genie_yamls/<uut os>/verification_datafile_<uut os>.yaml
is then used.
It is only needed to provide a new verification datafile if you want to modify the default file; otherwise the default one is all you need.
Note
For example <uut os> can be nxos
Trigger Datafile (Optional)
The trigger datafile contains all the information on the triggers.
If no trigger datafile is provided, the default datafile
$VIRTUAL_ENV/lib/python<version>/site-packages/genie/libs/sdk/genie_yamls/<uut os>/trigger_datafile_<uut os>.yaml
is then used.
It is only needed to provide a new trigger datafile if you want to modify the default file; otherwise the default one is all you need.
Note
For example <uut os> can be nxos
Subsection Datafile (Optional)
The subsection datafile contains all the information on the subsection.
If no subsection datafile is provided, the default datafile
$VIRTUAL_ENV/lib/python<version>/site-packages/genie/libs/sdk/genie_yamls/subsection_datafile.yaml
is then used.
It is only needed to provide a new subsection datafile if you want to modify the default file; otherwise the default one is all you need.
Note
A subsection is a section of Common setup or Common cleanup.
Configuration Datafile (Optional)
The configuration datafile contains all the information on how to configure the device. If no subsection datafile is provided, then the devices are not configured.
PTS Datafile (Optional)
The PTS datafile contains all the information on what to profile in the common
setup and cleanup. If no PTS datafile is provided, the default datafile
$VIRTUAL_ENV/lib/python<version>/site-packages/genie/libs/sdk/genie_yamls/pts_datafile.yaml
is then used.
It is only needed to provide a new profile datafile if you want to modify the default file; otherwise the default one is all you need.
Note
PTS stands for Profile The System
5. How to connect to your devices with the Harness?
Each device must be defined in the Testbed file and in the Mapping datafile either by name or device alias like in the above recipe.
6. Connection pool with the harness
Using a :connection-pool:`connection pool <http>` is a huge performance boost! Instead of sending all the commands one after the other, they are sent in parallel!
As long as your device can accept multiple connections on the same port, then its ready to be used, for example, the management port.
The mapping datafile must be modified to add the pool size.
devices:
    uut:
       pool_size: 2
       context: cli
       mapping:
         # Associate cli with connection a
         cli: vty
This will initialize 2 connections to the uut and the cli commands will go up to twice as fast! This number can scale up to what your device can support.
In order to use connection pool for different connections, the new mapping schema needs to be followed.
Note: via and alias keywords are mandatory when using new mapping schema.
.. code-block:: python
- devices:
- uut:
- mapping:
- context:
- cli:
via: cli alias: cli1 pool_size: 2
- yang:
via: yang alias: netconf pool_size: 3
Note
Make sure the device can support multiple connection. Take a look at the vty connection.
7. How to apply the configuration to your devices?
There are 3 ways to apply configuration on your devices.
Configure the devices before the run gets started.
Just telnet to each device and configure them manually.
Apply the configuration in the common setup on the devices with tftp/scp/ssh.
This is done by passing information in the
configuration datafile.Create a new subsection and configure the devices.
More information on the getting started - configuration documentation.
8. What does the configuration_snapshot and verify_configuration_snapshot sections do ?
In a typical Genie run, the triggers do not modify the configuration of the device. Each action is either nondestructive or reverts the configuration.
These two sections verify that the configuration has not changed. The
configuration_snapshot take a snapshot of the configuration and
verify_configuration_snapshot verify it hasn’t changed.
Some configuration might want to be ignored as there might have dynamic values.
In the configuration datafile add to the key
exclude_config_check a list of value to exclude.
exclude_config_check: ['some configuration', '(certificate self-signed.*')]
Note
regex expression is supported when the string is surrounded with parentheses
9. What is the purpose of Profiling in Common Setup and Common Cleanup ?
The above recipe verifies that the configuration has not changed; this section deals with the operation state. Re-using our Ops object we take a snapshot at the beginning of the run and one at the end and we compare the state using our diff object.
If any trigger changed the operational state of a feature, this last check will flag it up.
10. How to add Traffic Generator to Genie Harness and how do they help to test?
For Traffic generator - take a look at the traffic documentation
11. Where can I see all the arguments which Genie harness supports?
All the arguments are documented right here!
12. What is a datafile schema
The schema datafiles define the expected format of the file and provide all the capabilities which are supported. The schemas must be respected for all datafile in pyATS and Genie.
All Genie schemas can be found on the datafile page.
13. How does the extends field work for Datafiles?
Use this field to extend an existing yaml testbed file, allowing you to create an inheritance hierarchy. Supports full path/names or a name of a file in the same dir. The content of the last file on the list forms the base and is updated with the preceding file, and so on until the existing file content is updated last. Using extends is optional; but very useful to modify existing datafiles.
14. Select which verifications to execute
Within the job file or as an easypy argument you can
use -verification_uids or -verification_groups argument to select which
verifications to execute.
The verification datafile schema explains all the capabilities that the verifications support.
Visit our documentation to view the list of all available :verifications:`verification <http>`.
Note
groups are added in the verification datafile
15. Modify existing Verification arguments
All verifications are defined in the verification yaml datafile which defines
how to load each verification, arguments to provide and on which device to
execute. The default datafiles can be found at
$VIRTUAL_ENV/lib/python<version>/site-packages/genie/libs/sdk/genie_yamls/verification_datafile.yaml and
$VIRTUAL_ENV/lib/python<version>/site-packages/genie/libs/sdk/genie_yamls/<uut os>/verification_datafile_<uut os>.yaml.
To modify any of the value for the verification you have to
create a new yaml datafile which extends from the main one.
Modify the value
Now refer to this datafile when launching Genie with the
-verification_datafile argument.
16. Write a new verification
A verification can be of three types.
Command bases verification - A parser is called and the structure is compared
Ops based verification - An Ops object is called and the structure is compared
Callable based verification - Do as you wish
Visit the developer guide on verification for more detail.
17. Select which trigger to execute
Within the job file or as an easypy argument you can
use --trigger-uids and/or --trigger-groups argument to select which
triggers to execute.
When both ‘–trigger-uids’ and ‘–trigger-groups’ are provided, both will be used to elect triggers from trigger datafile.
The trigger datafile schema explains all the capabilities that the triggers support.
Visit our documentation to view the list of all available triggers.
gRun(trigger_uids=['TriggerUnconfigConfigBgp', 'TriggerShutNoShutEthernetInterface', 'TriggerUnconfigConfigBgp'])
Note
groups are added in the trigger datafile
18. Modify existing triggers arguments
All triggers are defined in the trigger yaml datafile which defines
how to load each trigger, arguments to provide and on which device to
execute. The default datafiles can be found at
$VIRTUAL_ENV/lib/python<version>/site-packages/genie/libs/sdk/genie_yamls/trigger_datafile.yaml and
$VIRTUAL_ENV/lib/python<version>/site-packages/genie/libs/sdk/genie_yamls/<uut os>/trigger_datafile_<uut os>.yaml.
To modify any of the value for the trigger you have to:
create a new yaml datafile which extends from the main one.
Modify the value
Now refer to this datafile when launching Genie with the
-trigger_datafile argument.
To modify the actual code and not only the arguments, please visit our :commit:`commit <http>` guideline.
19. Write a new trigger
A trigger is a set of actions and verifications that, together, constitute a testcase.
Visit the developer guide on trigger for more detail.
20. Apply configuration to your devices
Genie provides the possibility to apply full configuration on the device in the
Common Setup. The configurations file are copied on the device and then applied.
The configuration yaml datafile is provided with the config_datafile argument.
Here is an example of the configuration yaml file. Provide the location of the configuration, any sleep time if it takes times to stabilize on the device.
devices:
    uut:
        1:
          config: /path/to/my/configuration
          sleep: 3
          invalid: ['overlaps', '(.*inval.*)']
        2:
          config: <full path>
          sleep: 2
It also requires a valid server to transfer the files to the devices.
Take a look at the full documentation for more information.
21. Profile the system
Profiling the system allow to take snapshot at the begining of the run, and compare with the same feature at the end of the run. This is useful to make sure no feature was altered in an non expected way.
All :parsers:`available device command<http>` and all :models:`Ops features <http>` can be profiled.
Here how to profile a feature:
gRun(pts_features=['platform', 'show ip route vrf default',
                   'show ip ospf interface',
                   'show ip ospf interface vrf default',
                   'show ip ospf vrf default', 'show vrf detail'])
All feature to be profiled are defined in the PTS (profile the system) yaml
file which defines which keys to exclude, arguments to provide and on which
device to execute. The default datafiles can be found at
$VIRTUAL_ENV/lib/python<version>/site-packages/genie/libs/sdk/genie_yamls/pts_datafile.yaml.
All parsers does not need to be added to this file, and will exclude all keys
defined in the Verification datafile.
More information in the PTS getting started page.
Note
This section complement the above section on profiling Profiling.
Note
To reduce execution time, PTS is designed with concurrent execution in profiling.
22. Golden PTS
After applying the configuration on the device in the Common Setup; we are waiting for some time for the system to stabilize. However, how to know if it has stabilized as expected?
The Golden PTS is a snapshot from a previous run to compare the PTS objects with. If there are differences, the section will fail and the run will not continue.
23. What can you do with the mapping datafile
The mapping datafile create the relation between the testbed datafile and Genie. By concept, the testbed datafile describes the testbed in general for any script that wants to use this testbed. For Genie, we need to know more information such as:
What connection to use for Cli action, for Yang action, Xml, etc
Provide connection pool information per device
Overwrite devices alias
Which connection type to prioritize for the run
Support for multiple connections per context(cli/yang/etc) with new schema
It is optional to have a mapping datafile. Genie will connect to all devices
(defined in testbed yaml file) only if no mapping datafile is provided.
An example can be found in the getting started. The datafile schema contains the syntax on how to set the datafile.
devices:
    uut:
       context: cli
       pool_size: 5
       mapping:
         # Associate cli with connection vty
         cli: vty
         yang: yang
The multiple connections are supported in mapping datafile, by the new schema:
Note: via and alias keywords are mandatory when using new mapping schema.
devices:
  uut:
    mapping:
      context:
          cli:
           - via: ssh
             alias: cli
             pool_size: 2
24. Add/Remove subsections
With the Subsection datafile, all sections in Genie can be customized. You can
add, remove and even modify subsections. You can also change the execution
order. The default datafile can be found at
$VIRTUAL_ENV/lib/python<version>/site-packages/genie/libs/sdk/genie_yamls/subsection_datafile.yaml.
Here are the steps on how to create a new subsection.
Create a new subsection
Create a new subsection datafile which extends from the main one
Add the new subsection to the subsection datafile
Give it an order
Good to go!
To remove a subsection; just remove it from the order list. A subsection which is not in the order list will not be executed.
Create a new subsection datafile which extends from the main one
Remove the subsection from the order.
25. Processors
:processors:`Processors <http>` are functions which are scheduled to run immediately before and after any sections.
Processors can be added before and after common setup, Common cleanup, any subsection, trigger, trigger section, and verification.
Within their corresponding datafile processor can be added for these sections.
Let’s write a processor to run after a trigger to verify that the devices are still alive.
def are_device_alive(section):
    # Find uut device
    testbed = section.parameters['testbed']
    for name, dev in testbed.devices.items()
        dev.execute('')
Now let’s add it to one of our trigger. We are picking nxos for now, you can pick the os desired. To add a processor; we need to add it to the trigger datafile.
extends: "%CALLABLE{genie.libs.sdk.genie_yamls.datafile(trigger, nxos)}"
TriggerSleep:
    processor:
        post:
            AreDeviceAlive:
                method: processor.are_device_alive
It’s now time to execute this trigger.
26. How to re-use existing Triggers/Verifications within an existing pyATS Script.
All triggers and verifications can be re-used within pyATS. They can be either run as a Testcase, or within a testcase depending of the need.
More information on Genie within pyATS documentation.
27. What kind of examples is there for Genie Harness?
All the examples can be found in the example page.
28. Update verification snapshots
Within a trigger or a processor; one of the verification snapshots might need to be re-taken.
The snapshots are stored at the testscript level in a dictionary named verf; then indexed by devices. By deleting the snapshot, a new one will be automatically taken the next time the verification is executed.
def re_take_snapshot(section):
    # Find uut device
    testbed = section.parameters['testbed']
    for name, dev in testbed.devices.items()
        del section.parent.verf[name]['Verify_Interface']
29. Randomize Triggers
By default triggers are always run following their order in the list. By adding –random then the triggers will run in a random order.
gRun(pts_features=['platform', 'bgp', 'interface'],
     verification_uids=['Verify_IpInterfaceBrief', 'Verify_IpRoute_vrf_all'],
     trigger_uids=['TriggerUnconfigConfigBgp.uut', 'TriggerShutNoShutBgpNeighbors', 'TriggerModifyLoopbackInterfaceIp.uut', 'TriggerShutNoShutEthernetInterface'],
     random=True)
Randomization seed integer can be used to fix the randomizer and re-generate
the same testcase sequence, useful for debugging purposes. The seed can be
found in the log Testcase randomization is enabled, seed: 1868797651672894108
gRun(pts_features=['platform', 'bgp', 'interface'],
     verification_uids=['Verify_IpInterfaceBrief', 'Verify_IpRoute_vrf_all'],
     trigger_uids=['TriggerUnconfigConfigBgp.uut', 'TriggerShutNoShutBgpNeighbors', 'TriggerModifyLoopbackInterfaceIp.uut', 'TriggerShutNoShutEthernetInterface'],
     random=True, randomize_seed=1868797651672894108)
30. Trigger containing multiple Triggers and Verifications
Multiple triggers and verificaiton can be executed within a single Trigger.
In the Trigger datafile:
TriggerCluster:
    sub_verifications: ['Verify_BgpVrfAllAll']
    sub_triggers: [ 'TriggerSleep', 'TriggerShutNoShutBgp']
    sub_order: ['TriggerSleep', 'Verify_BgpVrfAllAll', 'TriggerSleep', 'TriggerShutNoShutBgp', 'Verify_BgpVrfAllAll']
    devices: ['uut']
Which will provide this
-- TriggerCluster.uut                                                    PASSED
   |-- TriggerSleep_sleep.1                                              PASSED
   |-- TestcaseVerificationOps_verify.2                                  PASSED
   |-- TriggerSleep_sleep.3                                              PASSED
   |-- TriggerShutNoShutBgp_verify_prerequisite.4                        PASSED
   |   |-- Step 1: Learning 'Bgp' Ops                                    PASSED
   |   |-- Step 2: Verifying requirements                                PASSED
   |   |-- Step 3: Merge requirements                                    PASSED
   |-- TriggerShutNoShutBgp_shut.5                                       PASSED
   |   |-- Step 1: Configuring 'Bgp'                                     PASSED
   |-- TriggerShutNoShutBgp_verify_shut.6                                PASSED
   |   |-- Step 1: Verifying 'Bgp' state with ops.bgp.bgp.Bgp            PASSED
   |-- TriggerShutNoShutBgp_unshut.7                                     PASSED
   |   |-- Step 1: Unconfiguring 'Bgp'                                   PASSED
   |-- TriggerShutNoShutBgp_verify_initial_state.8                       PASSED
   |   |-- Step 1: Verifying ops 'Bgp' is back to original state         PASSED
   |-- TestcaseVerificationOps_verify.9                                  PASSED
This allow you to create ANY combination of triggers and verification into 1 trigger; a cluster trigger.
31. Loop a Trigger
It is possible to loop over a trigger multiple times using the loop feature of aetest.
This is useful for cutting down on unnecessary repetition in a testcase and improving efficiency.
Read more on it here: AETest Loop
A simple example of this is as follows:
from pyats import aetest
from genie.harness.base import Trigger

@aetest.loop(uids=['Test1', 'Test2', 'Test3'])
class TriggerAetestLoop(Trigger):
    @aetest.test
    def test(self, testbed, steps):
        print(self.uid)
This will run the trigger three times, with each trigger having and printing the uids ‘Test1’, ‘Test2’, ‘Test3’
Loops can be extended by using a loop generator
from pyats import aetest
from pyats import easypy
from pyats.aetest.loop import Iteration

class TestCaseGenerator(object):
    def __init__(self, loopee):
        self.uid = loopee.uid

    def __iter__(self):
        for i in range(3):
            yield Iteration(
                uid = 'Test' + str(i+1),
                parameters = {'num': i+1}
            )

@aetest.loop(generator=TestCaseGenerator)
class TriggerAetestLoop(Trigger):
    @aetest.test
    def test(self, testbed, steps, num):
        print(num)
Using a loop generator allows for each iteration of the trigger to be more uniquely defined.
In the above example, we are yielding three Iteration that sets the uid to the strings
‘Test1’, ‘Test2’, ‘Test3’. We are also able to pass it a dictionary of parameters, in this
case it’s a single parameter of num which will be the numbers 1 through 3.
32. Run command or API on failure
It’s possible to run a command or API at the end of your test section using the post_execute_command
processor, but did you know that you’re able to specify which result to run the command on?
If for example, you wanted to run a command if and only if the section failed, you would pass
valid_section_results = ['failed'] to the post_execute_command processor.
This can be done with both standalone aetest and genie harness like so:
Standalone
# pyATS
from pyats import aetest
from pyats import topology

# Genie
from genie.libs.sdk.libs.abstracted_libs.processors import post_execute_command


# Decorator for running processors
@aetest.processors(post = [post_execute_command])
class RunPostProcessor(aetest.Testcase):
    @aetest.setup
    def Setup(self, testbed):

        # Connect to testbed
        testbed.connect()

        # Fail testcase and run command
        self.failed('Failing')

if __name__ == '__main__':
    aetest.main(
        testscript=__file__,

        # Load topology and assign it to `testbed` parameter
        testbed=topology.loader.load('testbed.yaml'),

        # Set `devices` parameter to define which commands you would like to run
        devices = {
            'uut': {
                'cmds': [
                    {'cmd': 'command_1'},
                    {'cmd': 'command_2'},
                    {'cmd': 'command_3'},
                ],
                'apis': [{
                    'api': 'get_bgp_summary',
                    'arguments': {
                        'vrf': 'blue'
                    }
                }]
            }
        },

        # Set `valid_section_results` parameter to define what state to run
        # commands on which devices. Default is all states
        valid_section_results=[
            'failed'
        ]
    )
You can copy this, change the necessary variables, and run it with python standalone_processor_example.py
Genie Harness
# Import Genie run
from genie.harness.main import gRun

def main():
    gRun(
        trigger_datafile='pyats_processor_test_trigger.yaml',
        trigger_uids='ProcessorTrigger',
        testbed="testbed.yaml"
        )
# pyATS
from pyats import aetest

# Genie
from genie.harness.base import Trigger

# Trigger setup to fail
class ProcessorTrigger(Trigger):
    @aetest.setup
    def Setup(self):
        self.failed('Failed')
ProcessorTrigger:
    source:
        class: "harness_processor_testcase_example.ProcessorTrigger"
    devices:
        - &uut device_name
    processors:
        post:
            post_execute:
                method: genie.libs.sdk.libs.abstracted_libs.processors.post_execute_command
                valid_section_results:
                    - 'failed'
                parameters:
                    devices:
                        *uut:
                            cmds:
                                - cmd: 'show version'
                            apis:
                                - api: get_bgp_summary
                                  arguments:
                                      vrf: blue
                                - api: my_custom_api
                                  module: my_module
                                  arguments:
                                    vrf: yellow
You can specify a python module name using the module option to load the module and call your custom API.
The device object and arguments specified under arguments will be passed to the API method.
An example module and API is shown below.
import logging
log = logging.getLogger(__name__)

# Example python API
def my_custom_api(device, **kwargs):
    device.execute('show version')
    if kwargs.get('vrf') == 'yellow':
        log.info('Collecting info for yellow VRF')
        ...
You can copy this, change the necessary variables, and run it with pyats run job harness_processor_job_example.py
33. Repeated execution of Triggers
To execute a trigger multiple times, use the order definition in the trigger datafile.
You can provide a list of trigger names to execute and repeat the same trigger as needed.
# extend the default triggers
extends: "%CALLABLE{genie.libs.sdk.genie_yamls.datafile(trigger)}"

order:
- TriggerSleep
- TriggerSleep
As of release 23.1, you can provide a list of dictionaries with trigger data. This allows triggers to be execute repeatedly with different settings.
# extend the default triggers
extends: "%CALLABLE{genie.libs.sdk.genie_yamls.datafile(trigger)}"

order:
- TriggerSleep:
    sleep_time: 4
    message_time: 2
    devices: [uut1, uut2]
- TriggerSleep:
    sleep_time: 10
    message_time: 1
    devices: [uut3, uut4]